Configure models, connect external messaging channels, set up on-demand mode, and understand the service reliability features of your NovitaClaw instance.

On-Demand Mode

On-demand mode automatically pauses your sandbox after a configurable idle period and resumes it on access. Ideal for low-traffic AI assistants, webhook-based IM integrations, and scheduled tasks. Zero billing while paused.

Launching an On-Demand Sandbox

Bash
# Default idle timeout: 300 seconds
novitaclaw launch --type on-demand

# Custom idle timeout (60–86400 seconds)
novitaclaw launch --type on-demand --idle-timeout 600
On-demand mode cannot be combined with --mode node.

Manual Pause and Resume

Bash
# Pause a sandbox (zero billing while paused)
novitaclaw pause <SANDBOX_ID>

# Resume a sandbox (~1s to restore to pre-pause state)
novitaclaw resume <SANDBOX_ID>

Runtime Configuration

Bash
# Update idle timeout (60–86400 seconds)
novitaclaw config set <SANDBOX_ID> idle-timeout 600

# Update sandbox lifetime timeout (300–2592000 seconds)
novitaclaw config set <SANDBOX_ID> timeout 3600
Changes take effect immediately. The in-sandbox agent picks up the new configuration on its next check cycle.

How It Works

  1. Idle detection — An agent daemon inside the sandbox periodically checks OpenClaw session activity and writes status to /tmp/.novitaclaw-status.json.
  2. Auto-pause — The server-side idle monitor reads the agent status. After 2 consecutive idle checks, the sandbox is automatically paused.
  3. Auto-resume — Incoming webhook requests or Web UI access automatically resume a paused sandbox.
  4. Cron pre-wakeup — The scheduler scans paused sandboxes for upcoming cron schedules and resumes them ~120 seconds before the next job fires, ensuring cron jobs run on time.

Checking Status

Bash
# View sandbox status (does not trigger resume when paused)
novitaclaw status <SANDBOX_ID>

# List shows sandbox_type and state columns
novitaclaw list
While paused, the status command still returns full URL information (read from the database without connecting to the sandbox), so scripts can store addresses without triggering a resume.

Configuring Models

Your instance is pre-configured with a Novita-hosted model out of the box. To change the models your agent uses, navigate to Settings → Config, click Raw to switch to Raw JSON5 view, then click the reveal button next to “secrets redacted” to show the full config. Update the following two sections:

Step 1: Register the model under your provider

Add a new object to the models array inside models.providers.novita:
{
  "models": {
    "providers": {
      "novita": {
        "models": [
          {
            "id": "model-id",
            "name": "display name",
            "reasoning": true,
            "input": ["text"],
            "contextWindow": 200000,
            "maxTokens": 50000
          }
        ]
      }
    }
  }
}

Step 2: Set it as primary or fallback

Update the model field under agents.defaults to reference your model using the provider/model-id format:
{
  "agents": {
    "defaults": {
      "model": {
        "primary": "novita/model-id",
        "fallbacks": ["novita/fallback-model-id"]
      }
    }
  }
}
Click Update to save. Every LLM available on the Novita platform is supported. Third-party providers can also be configured — when you bring your own LLM, you pay only for sandbox runtime, not Novita model usage.
NovitaClaw model configuration

Connecting Channels

OpenClaw supports external messaging channels so your agent is reachable outside the Web UI. Channels are disabled by default and must be configured.

Telegram

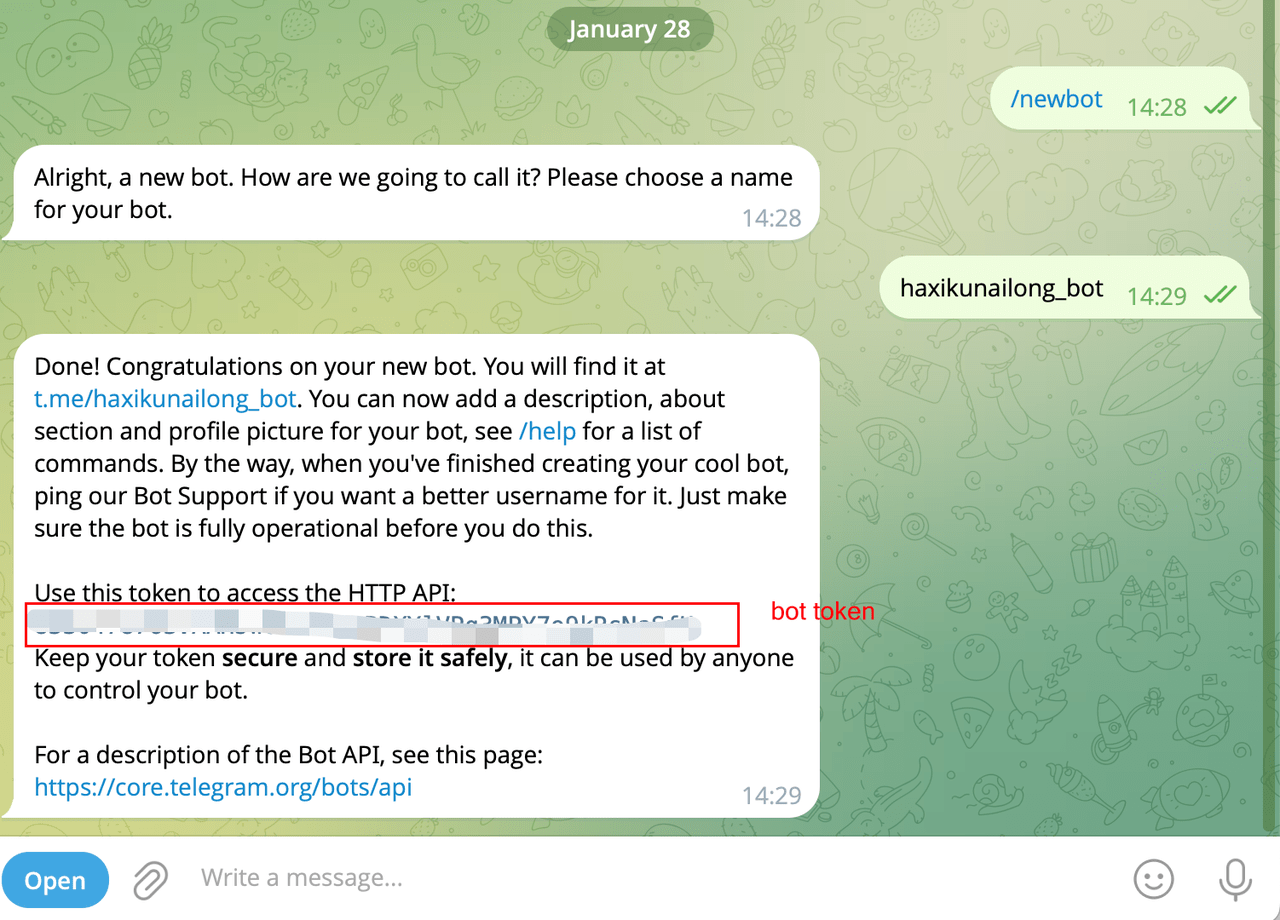
Connect your agent to Telegram as a messaging channel. Two connection modes are supported: Polling (default, long-poll — no public URL needed) and Webhook (HTTP push — best for on-demand sandboxes). Step 1: Create a Telegram Bot
  1. Open Telegram and find @BotFather.
  2. Send /newbot and follow the prompts to name your bot.
  3. Copy the bot token BotFather provides.

Mode 1: Polling

Polling mode uses long-poll connections. No public URL required — simplest to configure.
Polling mode is not recommended for on-demand sandboxes. When the sandbox auto-pauses, the connection drops and incoming messages are lost. Use Webhook mode for on-demand sandboxes.
Bash
novitaclaw pair telegram <SANDBOX_ID> \
  --bot-token <BOT_TOKEN>

Mode 2: Webhook

Webhook mode requires the sandbox to expose an HTTP port for receiving Telegram push events. Best suited for on-demand sandboxes — incoming webhook requests automatically trigger resume.
The --webhook-url is the public URL assigned to your sandbox. Run the following command to retrieve it:
Bash
novitaclaw status <SANDBOX_ID> --json | jq -r '.telegram_webhook_url'
Bash
novitaclaw pair telegram <SANDBOX_ID> \
  --bot-token <BOT_TOKEN> \
  --mode webhook \
  --webhook-url <WEBHOOK_URL> \
  --webhook-secret <SECRET>

Optional Webhook Parameters

ParameterDefaultDescription
--webhook-host0.0.0.0Webhook server bind address
--webhook-port8787Webhook listen port
--webhook-path/webhook/telegramWebhook URL path
--dm-policypairingDM policy

Pairing Flow

On first conversation, the bot replies with a pairing code:
Bash
# List pending pairing requests
novitaclaw pair list <SANDBOX_ID> --channel telegram

# Approve a pairing request
novitaclaw pair approve <SANDBOX_ID> --channel telegram --code <CODE>

Mode Comparison

PollingWebhook
ConnectionOutbound (long-poll)Inbound (HTTP push)
Public portNot requiredRequired
Setup complexityLowMedium (additional secrets)
On-demand auto-resumeNot supported (connection drops on pause)Supported (webhook triggers resume)
Recommended forAlways-on sandboxes, developmentOn-demand sandboxes, production IM

Slack

Connect your agent to Slack as a messaging channel. Two connection modes are supported: Socket (default, WebSocket — no public URL needed) and HTTP (Events API webhook — best for on-demand sandboxes).

Mode 1: Socket

Socket mode uses a WebSocket connection. No public URL required — simplest to configure.
Socket mode is not recommended for on-demand sandboxes. When the sandbox auto-pauses, the WebSocket connection drops and incoming messages are lost. Use HTTP mode for on-demand sandboxes.
Bash
novitaclaw pair slack <SANDBOX_ID> \
  --bot-token xoxb-... \
  --app-token xapp-...

Mode 2: HTTP

HTTP mode uses Slack Events API webhooks. Best suited for on-demand sandboxes — incoming webhook requests automatically trigger resume.
Bash
novitaclaw pair slack <SANDBOX_ID> \
  --bot-token xoxb-... \
  --mode http \
  --signing-secret <SECRET>

Optional HTTP Parameters

ParameterDefaultDescription
--webhook-host0.0.0.0Webhook server bind address
--webhook-port8788Webhook listen port
--webhook-path/webhook/slackWebhook URL path

Pairing Flow

On first conversation, the bot replies with a pairing code:
Bash
# List pending pairing requests
novitaclaw pair list <SANDBOX_ID> --channel slack

# Approve a pairing request
novitaclaw pair approve <SANDBOX_ID> --channel slack --code <CODE>

Mode Comparison

SocketHTTP
ConnectionWebSocket (outbound)HTTP push (inbound)
Public portNot requiredRequired
Setup complexityLowMedium (additional secrets)
On-demand auto-resumeNot supported (connection drops on pause)Supported (webhook triggers resume)
Recommended forAlways-on sandboxes, developmentOn-demand sandboxes, production IM

Channel Status

novitaclaw status displays webhook URLs for all configured channels:
Bash
novitaclaw status <SANDBOX_ID>
# Shows: Feishu Webhook, Telegram Webhook, Slack Webhook (when configured)

# JSON mode
novitaclaw status <SANDBOX_ID> --json | jq -r '.feishu_webhook_url'
novitaclaw status <SANDBOX_ID> --json | jq -r '.telegram_webhook_url'
novitaclaw status <SANDBOX_ID> --json | jq -r '.slack_webhook_url'

Feishu

Connect your agent to Feishu (Lark) as a messaging channel. Two connection modes are supported: Webhook (HTTP push) and Event (WebSocket long-poll).

Prerequisites: Create a Feishu App

  1. Open the Feishu Open Platform, log in and click Create Custom App.
  2. On the Credentials & Basic Info page, copy:
    • App ID (format: cli_xxx)
    • App Secret
  3. Go to Permission Management, click Batch Import, and paste the following permissions:
    {
      "scopes": {
        "tenant": [
          "im:message", "im:message:send_as_bot", "im:message:readonly",
          "im:message.p2p_msg:readonly", "im:message.group_at_msg:readonly",
          "im:resource", "im:chat.access_event.bot_p2p_chat:read",
          "im:chat.members:bot_access"
        ],
        "user": ["im:chat.access_event.bot_p2p_chat:read"]
      }
    }
    
  4. Go to App Capabilities > Bot and enable bot capability.
  5. Create a version and publish the app.

Mode 1: Webhook

Webhook mode requires the sandbox to expose an HTTP port for receiving Feishu push events. Best suited for on-demand sandboxes — incoming webhook requests automatically trigger resume. Additional credentials: On the Feishu Open Platform, go to Development Configuration > Events & Callbacks > Encryption Strategy and copy:
  • Verification Token
  • Encrypt Key
Bash
novitaclaw pair feishu <SANDBOX_ID> \
  --app-id cli_xxx \
  --app-secret secret_xxx \
  --mode webhook \
  --verification-token tok_xxx \
  --encrypt-key key_xxx
On the Feishu Open Platform Event Subscription page:
  1. Select Request URL Configuration
  2. Enter the Webhook URL — get it via:
    Bash
    novitaclaw status <SANDBOX_ID> --json | jq -r '.feishu_webhook_url'
    
  3. Add event: im.message.receive_v1

Mode 2: Event

Event mode uses a Feishu WebSocket long-poll connection. No public URL required — simplest to configure.
Event mode is not recommended for on-demand sandboxes. When the sandbox auto-pauses, the WebSocket connection drops and incoming messages are lost. Use Webhook mode for on-demand sandboxes.
Bash
novitaclaw pair feishu <SANDBOX_ID> \
  --app-id cli_xxx \
  --app-secret secret_xxx
After configuration, on the Feishu Open Platform Event Subscription page:
  1. Select Use Long Connection to Receive Events
  2. Add event: im.message.receive_v1
Ensure the gateway is running (novitaclaw status <SANDBOX_ID>) before saving, otherwise Feishu may fail to save the long connection configuration.

Optional Webhook Parameters

ParameterDefaultDescription
--webhook-host0.0.0.0Webhook server bind address
--webhook-port3000Webhook listen port
--webhook-path/feishu/eventsWebhook URL path

Pairing Flow

Feishu uses a pairing strategy by default. On first conversation, the bot replies with a pairing code that must be approved via CLI:
Bash
# List pending pairing requests
novitaclaw pair list <SANDBOX_ID> --channel feishu

# Approve a pairing request
novitaclaw pair approve <SANDBOX_ID> --channel feishu --code <CODE>

Mode Comparison

EventWebhook
ConnectionWebSocket long-poll (outbound)HTTP push (inbound)
Public portNot requiredRequired (default 3000)
Setup complexityLow (App ID + Secret only)Medium (additional Token + Key)
On-demand auto-resumeNot supportedSupported (webhook triggers resume)
Recommended forAlways-on sandboxes, developmentOn-demand sandboxes, production IM

Service Reliability

All core services in the sandbox are managed by systemd for production-grade reliability:
ServiceDescriptionAuto-Restart
OpenClaw GatewayAgent runtime and WebSocket server
Web Terminal (ttyd)Browser-based terminal access
File Manager (gohttpserver)Web-based file management
Crash auto-recovery: If the Gateway crashes repeatedly, the system automatically runs diagnostics, attempts repair, and restores the last known-good configuration from backup — no manual intervention required. Config auto-backup: Every configuration write creates an automatic backup. If a bad config causes a crash, the recovery process restores from the most recent valid backup.