> ## Documentation Index
> Fetch the complete documentation index at: https://novita.ai/docs/llms.txt
> Use this file to discover all available pages before exploring further.
# Portkey
> Portkey AI Gateway を Novita AI と併用して、高速・安全・信頼性の高いパフォーマンスを実現し、AI 開発を効率化します。
Portkey AI Gateway は、開発者が Novita AI のような AI モデルを扱う方法を変革します。高速・安全・信頼性の高いルーティングにより、複数の言語モデルへシームレスにアクセスできる統一インターフェースを提供します。この統合により、AI 開発が簡素化され、アプリケーションのパフォーマンスが向上します。
このガイドでは、Portkey AI Gateway のセットアップ方法と、その後 Portkey に Novita AI API を統合する方法を説明します。
## Portkey AI Gateway のセットアップ方法
Portkey AI Gateway のセットアップはシンプルで効率的です。必要なのは、ゲートウェイの設定、最初のリクエストの送信、シームレスなパフォーマンスのためのルーティングとガードレールの最適化という、3 つの主要な手順だけです。
### Step 1: AI Gateway をセットアップする
ゲートウェイをローカルで実行するには、Node.js と npm がシステムにインストールされていることを確認してください。準備ができたら、次のコマンドを実行します。
```jason theme={"system"}
npx @portkey-ai/gateway
```
ゲートウェイが起動すると、2 つの主要な URL が表示されます。
* Gateway: `http://localhost:8787/v1`
* Gateway Console: `http://localhost:8787/public/`
### Step 2: 最初のリクエストを送信する
まず、Portkey AI Python ライブラリをインストールします。
```python theme={"system"}
pip install -qU portkey-ai
```
次に、以下の Python コードを実行して最初のリクエストを送信します。
```python theme={"system"}
from portkey_ai import Portkey
# OpenAI compatible client
client = Portkey(
provider="openai", # or 'anthropic', 'bedrock', 'groq', etc
Authorization="sk-***" # the provider API key
)
# Make a request through your AI Gateway
client.chat.completions.create(
messages=[{"role": "user", "content": "What's the weather like?"}],
model="gpt-4o-mini"
)
```
Gateway Console(`http://localhost:8787/public/`)を使用すると、ローカルログをすべて 1 か所で簡単に監視できます。
### Step 3: ルーティングとガードレール
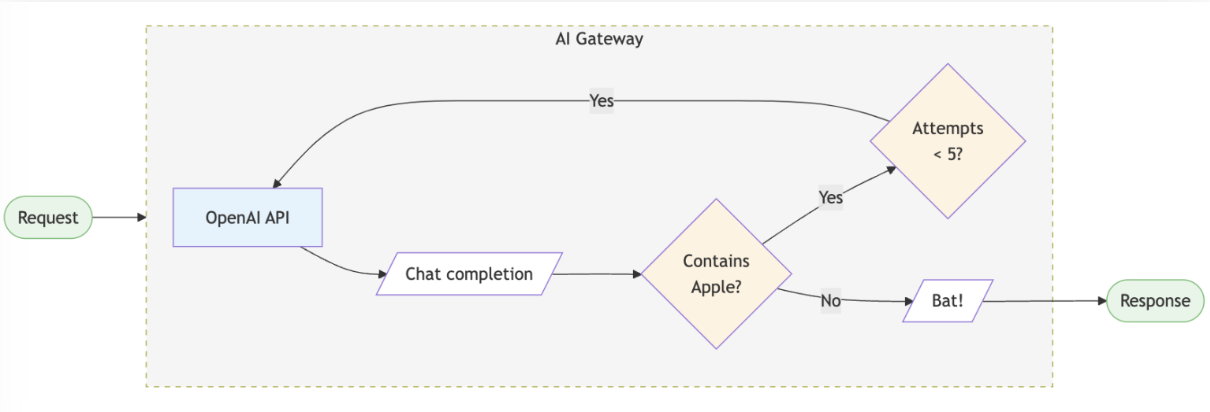
Portkey AI Gateway では、ルーティングルールの設定、信頼性機能の追加、ガードレールの適用が可能です。以下は設定例です。
```python theme={"system"}
config = {
"retry": {"attempts": 5},
"output_guardrails": [{
"default.contains": {"operator": "none", "words": ["Apple"]},
"deny": True
}]
}
# Attach the config to the client
client = client.with_options(config=config)
client.chat.completions.create(
model="gpt-4o-mini",
messages=[{"role": "user", "content": "Reply randomly with Apple or Bat"}]
)
# In this example, the guardrail denies all replies containing "Apple", so the response would always be "Bat". The retry configuration would attempt the request up to 5 times before giving up.
```
 ## Novita AI API を Portkey と統合する方法
Portkey AI Gateway 経由で Novita AI API にアクセスするには、次の手順に従ってください。
### Step 1: Portkey SDK をインストールする
Portkey SDK をアプリケーションに統合し、Portkey のゲートウェイを通じて Novita AI の API とシームレスにやり取りできるようにします。
**Node.JS**
```jason theme={"system"}
npm install --save portkey-ai
```
**Python**
```python theme={"system"}
pip install portkey-ai
```
### Step 2: Virtual Key を使用して Portkey を初期化する
Novita AI を Portkey と統合するには、[ Novita AI ](https://novita.ai/settings/key-management)から LLM API key を取得し、それを Portkey に追加して virtual key を生成します。
**Node.JS SDK**
```jason theme={"system"}
import Portkey from 'portkey-ai'
const portkey = new Portkey({
apiKey: "PORTKEY_API_KEY", // Replace with your Portkey API key
virtualKey: "VIRTUAL_KEY" // Replace with your virtual key for Novita AI
})
```
**Python SDK**
```python theme={"system"}
from portkey_ai import Portkey
portkey = Portkey(
api_key="PORTKEY_API_KEY", # Replace with your Portkey API key
virtual_key="VIRTUAL_KEY" # Replace with your virtual key for Novita AI
)
```
### Step 3: Novita AI で Chat Completions を呼び出す
Portkey インスタンスを使用して Novita AI にリクエストを送信します。必要に応じて、API 呼び出し内で virtual key を直接上書きできます。
**Node.JS SDK**
```jason theme={"system"}
const chatCompletion = await portkey.chat.completions.create({
messages: [{ role: 'user', content: 'Say this is a test' }],
model: 'Nous-Hermes-2-Mixtral-8x7B-DPO'
});
console.log(chatCompletion.choices);
```
**Python SDK**
```python theme={"system"}
completion = portkey.chat.completions.create(
messages= [{ "role": 'user', "content": 'Say this is a test' }],
model= 'reka-core'
)
print(completion)
```
## Novita AI API を Portkey と統合する方法
Portkey AI Gateway 経由で Novita AI API にアクセスするには、次の手順に従ってください。
### Step 1: Portkey SDK をインストールする
Portkey SDK をアプリケーションに統合し、Portkey のゲートウェイを通じて Novita AI の API とシームレスにやり取りできるようにします。
**Node.JS**
```jason theme={"system"}
npm install --save portkey-ai
```
**Python**
```python theme={"system"}
pip install portkey-ai
```
### Step 2: Virtual Key を使用して Portkey を初期化する
Novita AI を Portkey と統合するには、[ Novita AI ](https://novita.ai/settings/key-management)から LLM API key を取得し、それを Portkey に追加して virtual key を生成します。
**Node.JS SDK**
```jason theme={"system"}
import Portkey from 'portkey-ai'
const portkey = new Portkey({
apiKey: "PORTKEY_API_KEY", // Replace with your Portkey API key
virtualKey: "VIRTUAL_KEY" // Replace with your virtual key for Novita AI
})
```
**Python SDK**
```python theme={"system"}
from portkey_ai import Portkey
portkey = Portkey(
api_key="PORTKEY_API_KEY", # Replace with your Portkey API key
virtual_key="VIRTUAL_KEY" # Replace with your virtual key for Novita AI
)
```
### Step 3: Novita AI で Chat Completions を呼び出す
Portkey インスタンスを使用して Novita AI にリクエストを送信します。必要に応じて、API 呼び出し内で virtual key を直接上書きできます。
**Node.JS SDK**
```jason theme={"system"}
const chatCompletion = await portkey.chat.completions.create({
messages: [{ role: 'user', content: 'Say this is a test' }],
model: 'Nous-Hermes-2-Mixtral-8x7B-DPO'
});
console.log(chatCompletion.choices);
```
**Python SDK**
```python theme={"system"}
completion = portkey.chat.completions.create(
messages= [{ "role": 'user', "content": 'Say this is a test' }],
model= 'reka-core'
)
print(completion)
```