> ## Documentation Index
> Fetch the complete documentation index at: https://novita.ai/docs/llms.txt
> Use this file to discover all available pages before exploring further.

# LlamaIndex

> Novita AI と LlamaIndex を簡単に統合し、インテリジェントでデータ活用型のアプリケーションを構築します。

最適なインデックス化と検索を目的として設計された LlamaIndex は、正確かつ高速なデータアクセスを必要とするアプリケーションに高い効率性をもたらします。[Novita AI](https://novita.ai/) と LlamaIndex を組み合わせることで、優れたデータ検索精度、比類のないスケーラビリティ、コスト効率の高いパフォーマンスといった主要なメリットを得られます。

このガイドでは、OpenAl APl に基づいて Novita AI と LlamaIndex を使用する方法を説明します。開発者のイノベーションを促進し、優れた成果をもたらす、よりスマートでスケーラブルかつ高効率な AI ソリューションを提供します。

## **Novita AI API を LlamaIndex と統合する方法**

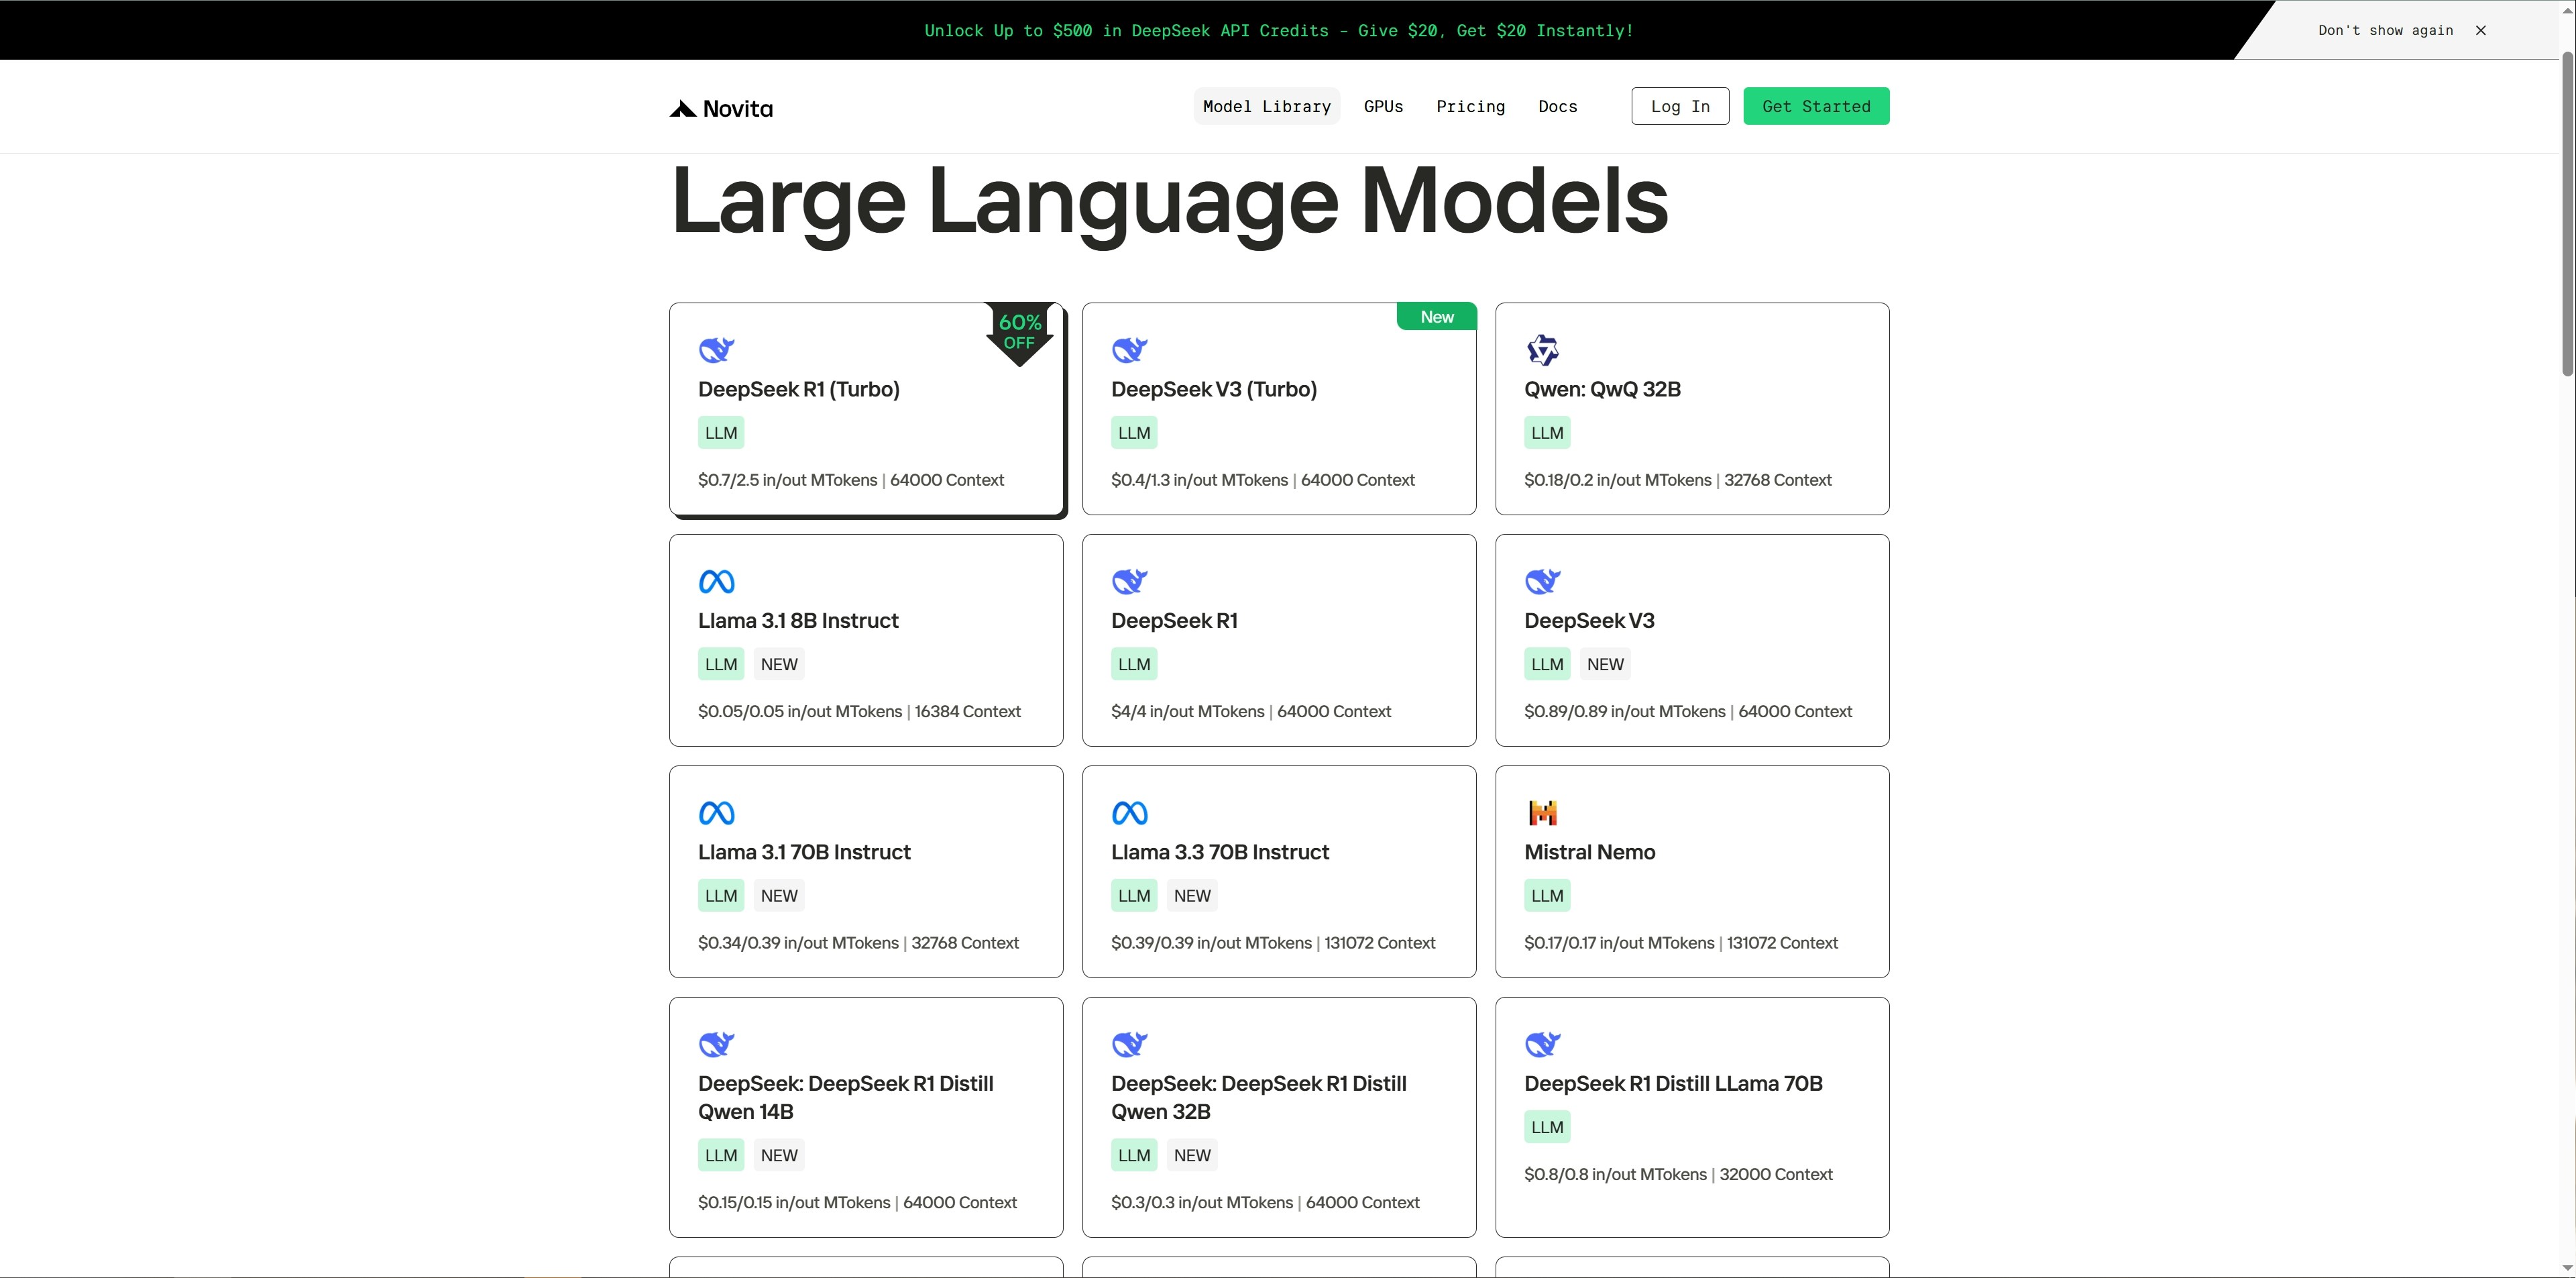
ステップ 1: Novita AI の [Model Library](https://novita.ai/llm-api) にアクセスし、関心のあるモデルを選択します。
<Frame>
  <img src="https://mintcdn.com/novitaai/bnRhXPrVKQGiPndx/images/Step1VisitModelLibraryonNovitaAIandselectamodelofinterest.png?fit=max&auto=format&n=bnRhXPrVKQGiPndx&q=85&s=d3db29afa82f298487c3284f24397510" alt="images/Step1VisitModelLibraryonNovitaAIandselectamodelofinterest.png" width="3841" height="1905" data-path="images/Step1VisitModelLibraryonNovitaAIandselectamodelofinterest.png" />
</Frame>

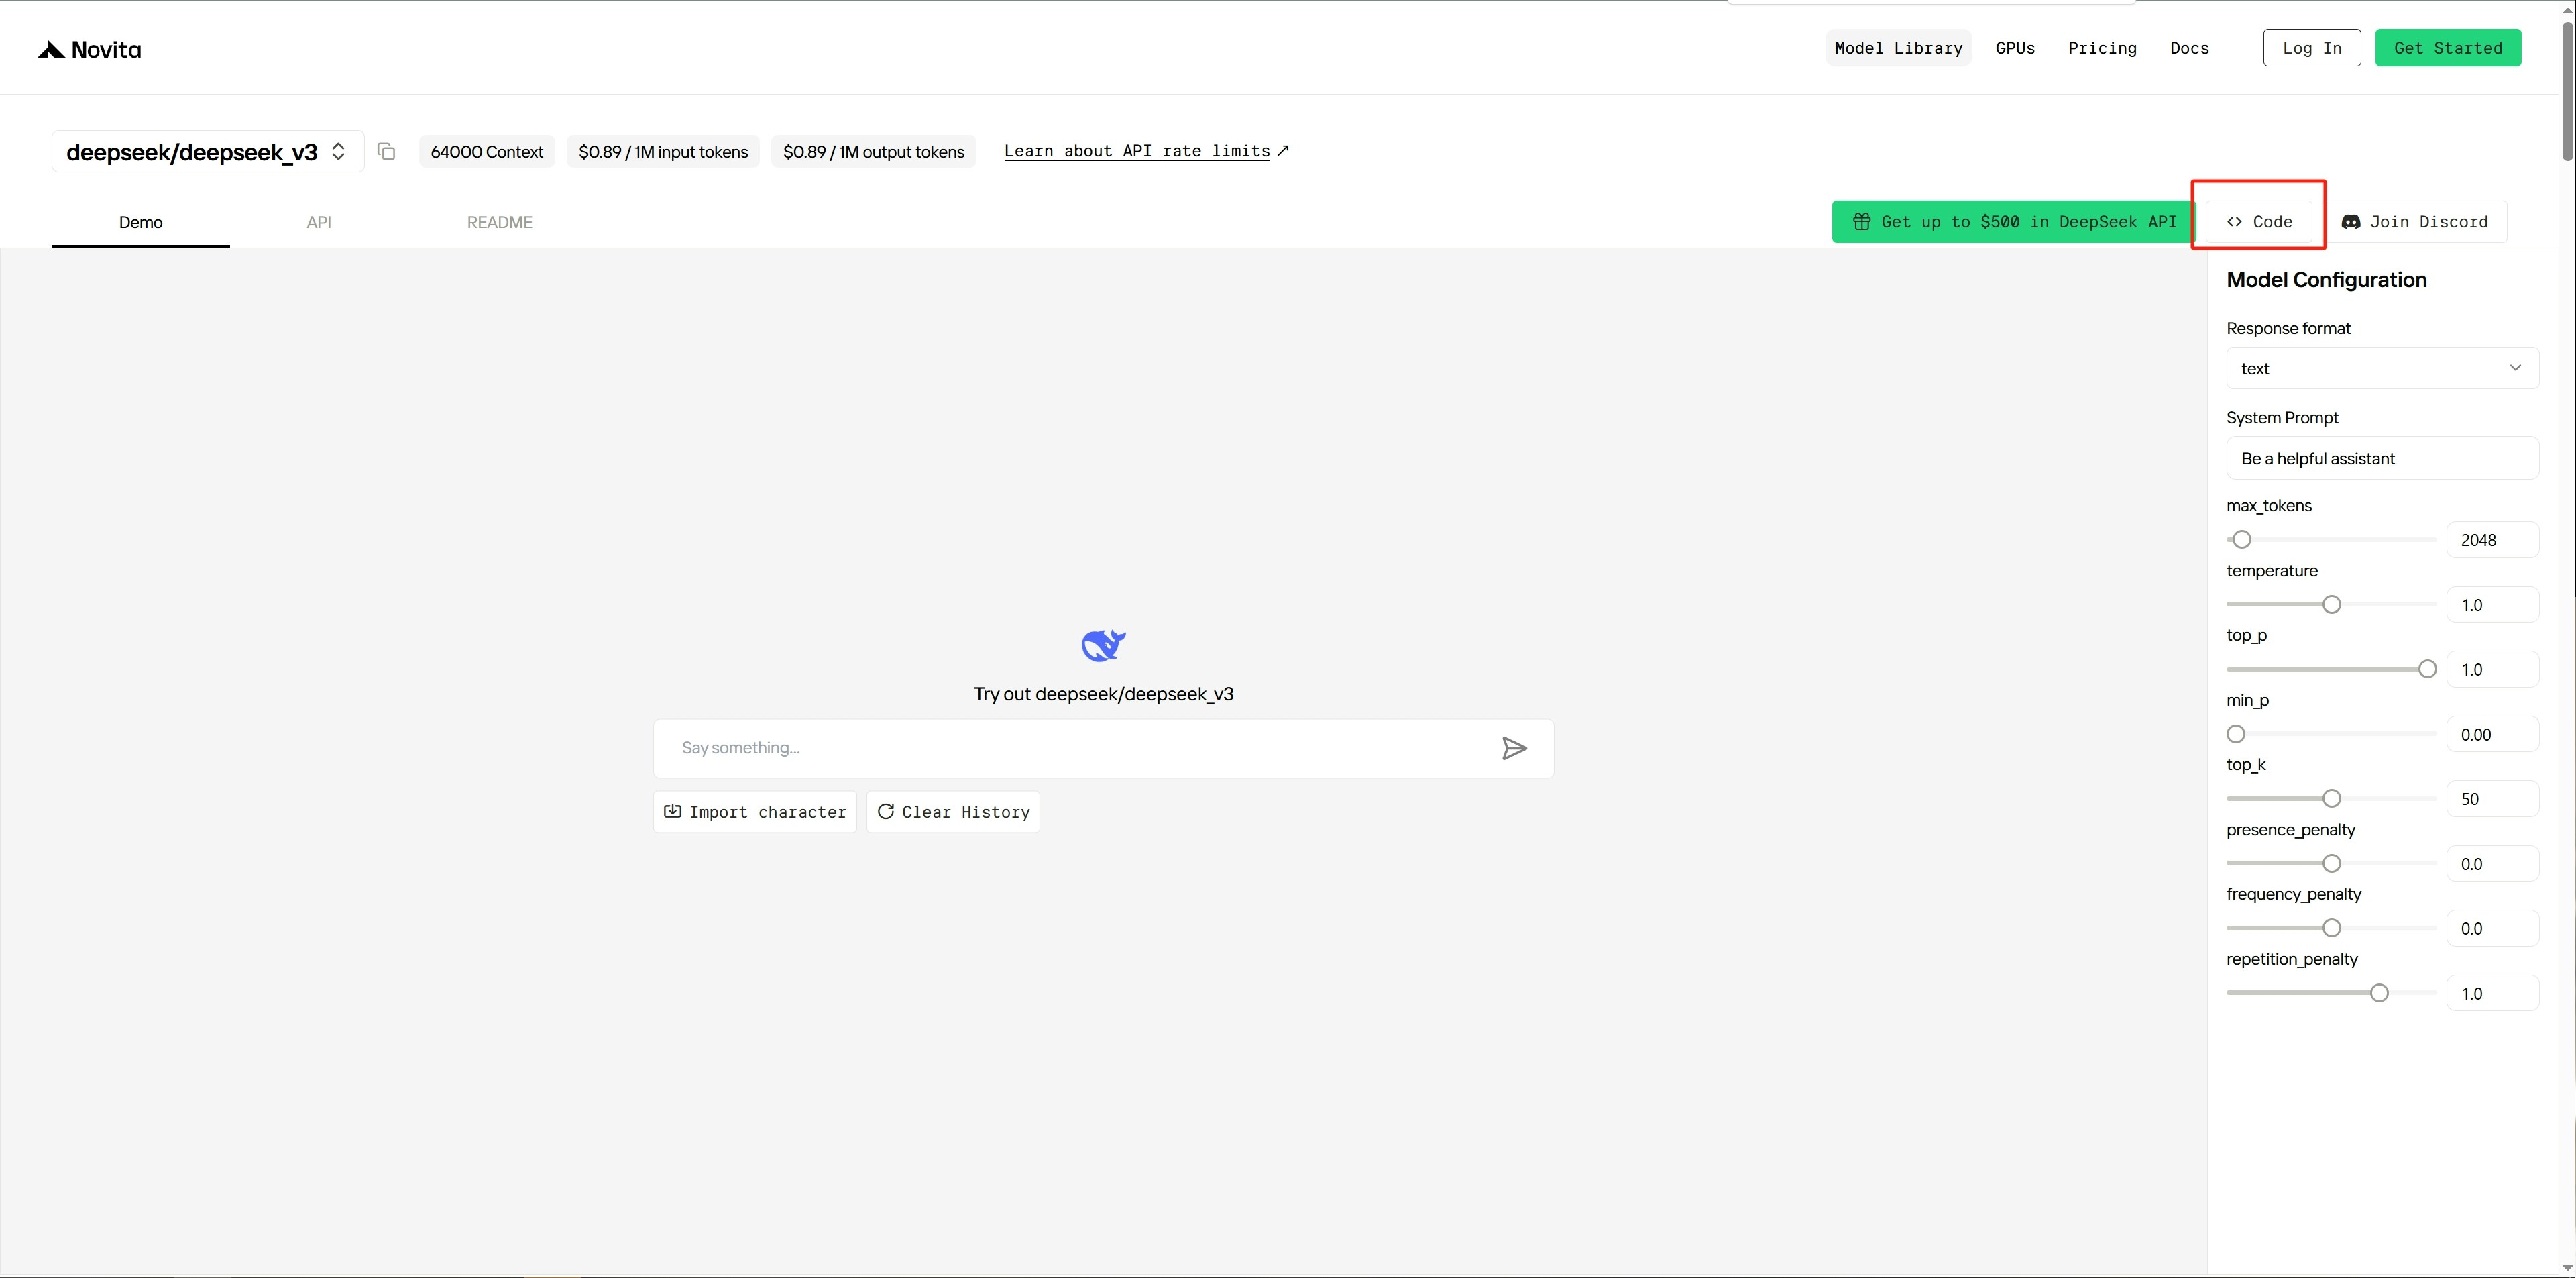
ステップ 2: 選択したモデルのデモページに移動し、右側の `Code` ボタンをクリックします。
<Frame>
  <img src="https://mintcdn.com/novitaai/bnRhXPrVKQGiPndx/images/Step2NavigatetothedemopageofthechosenmodelandclicktheCodebuttonontheright.png?fit=max&auto=format&n=bnRhXPrVKQGiPndx&q=85&s=e5ca58627abad4dd217b7ac3abd598e7" alt="images/Step2NavigatetothedemopageofthechosenmodelandclicktheCodebuttonontheright.png" width="3841" height="1905" data-path="images/Step2NavigatetothedemopageofthechosenmodelandclicktheCodebuttonontheright.png" />
</Frame>

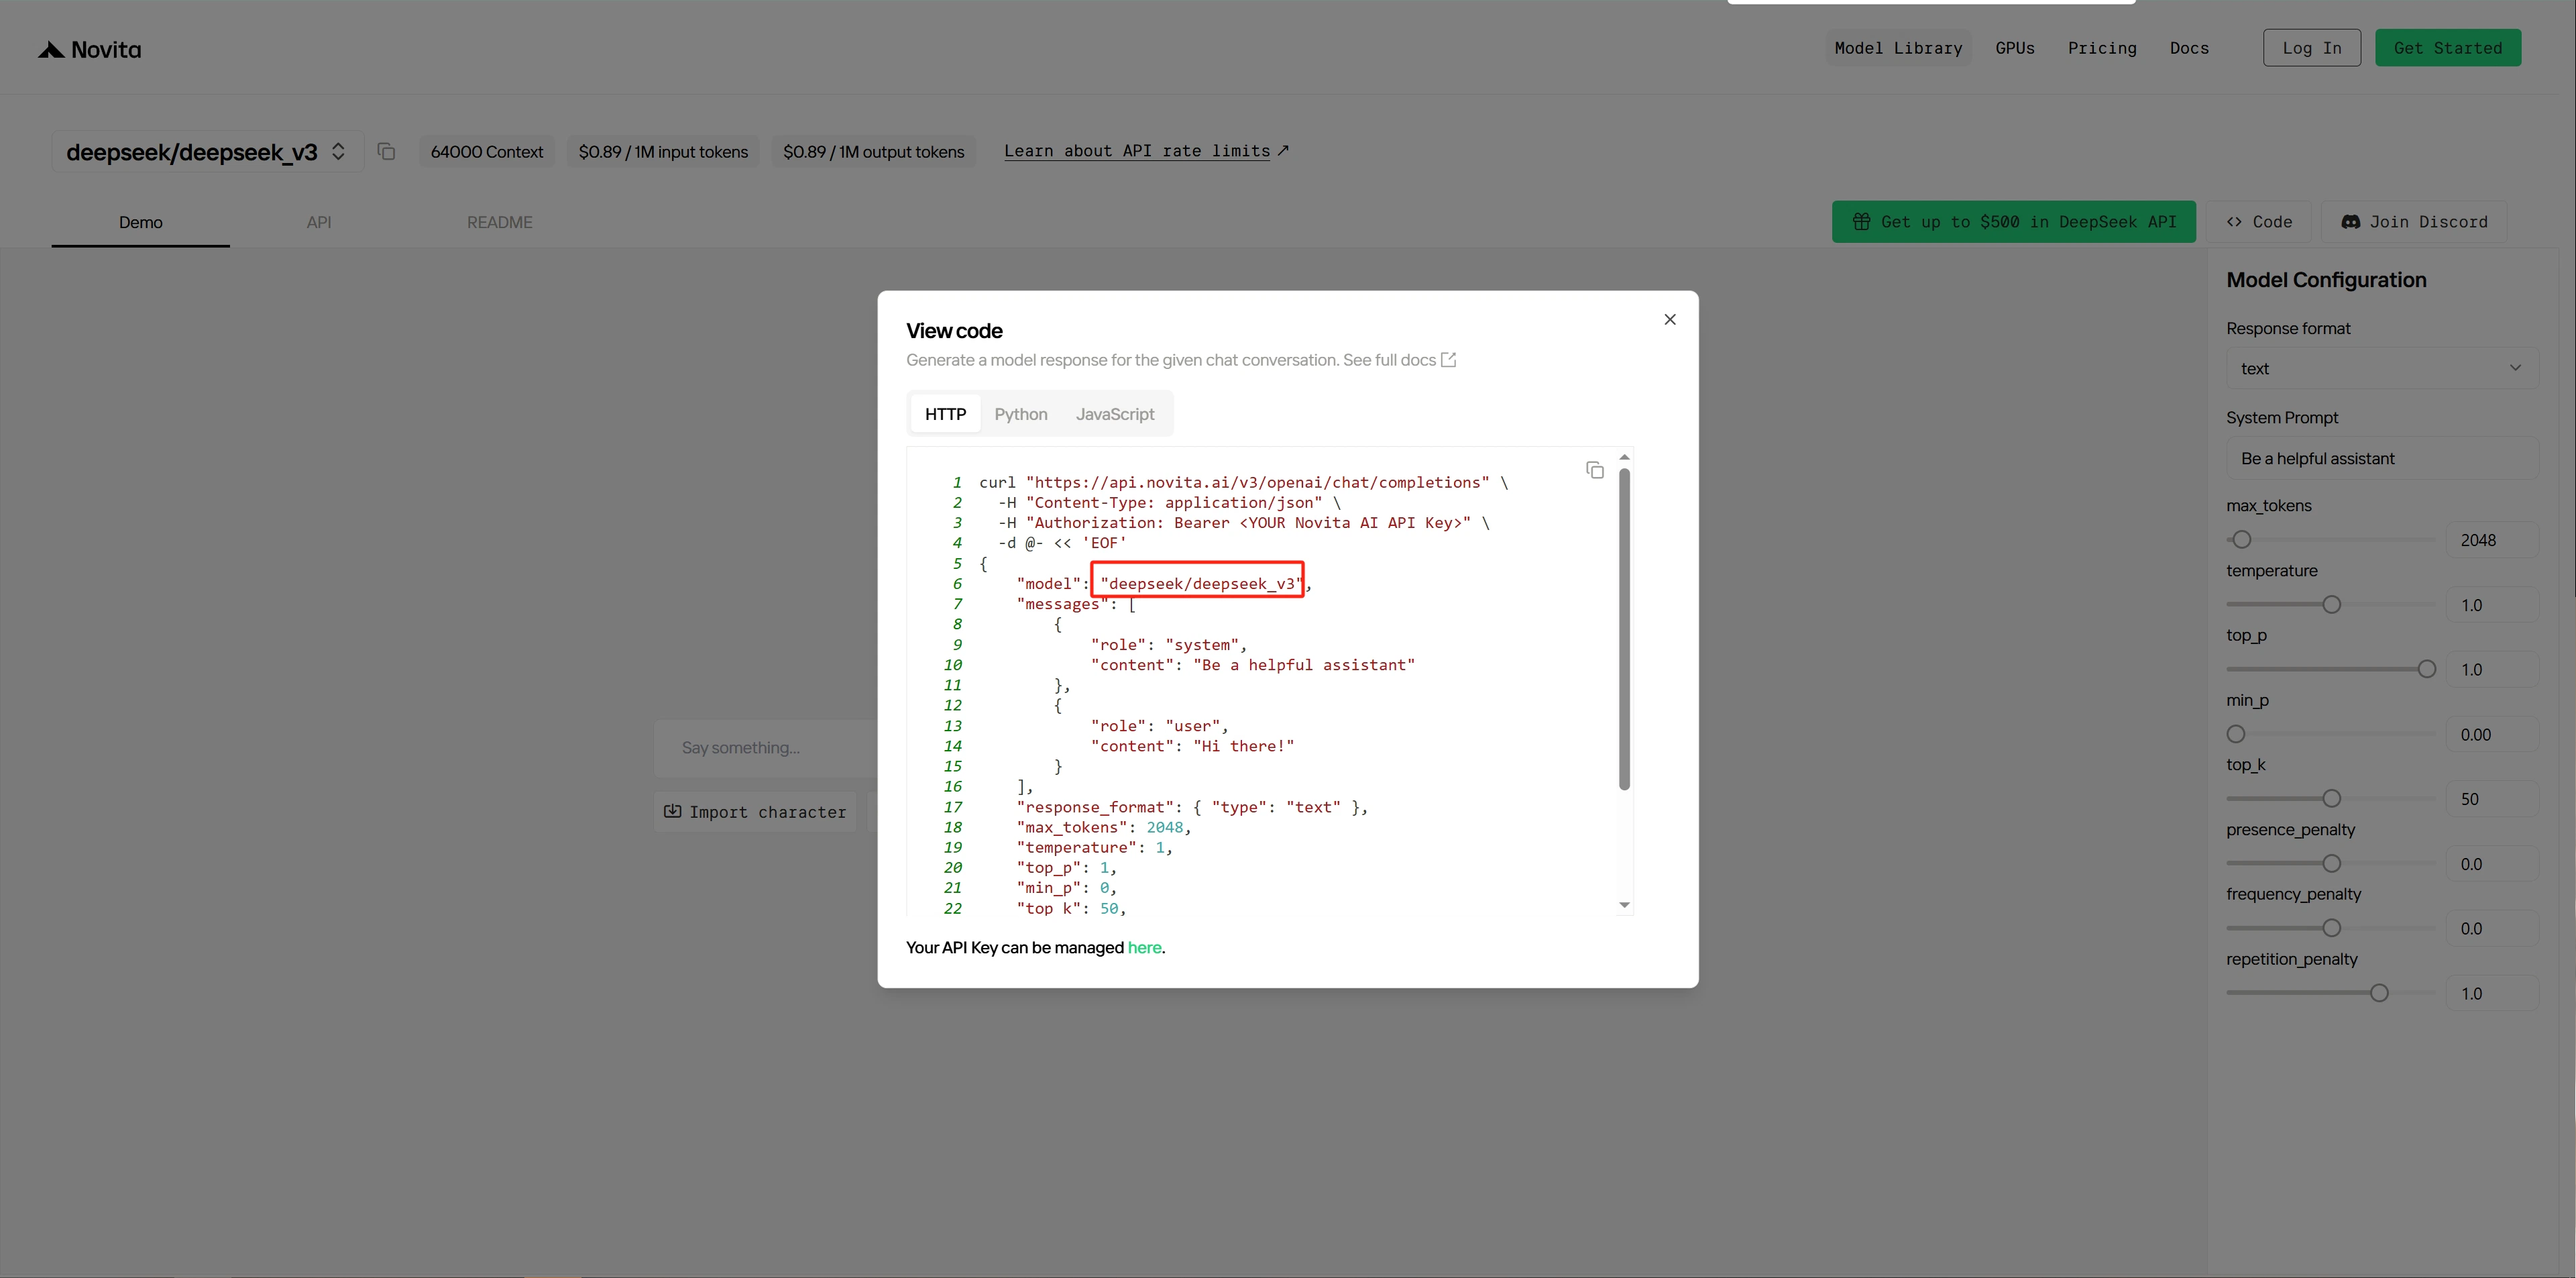
ステップ 3: モデル名をコピーしてメモします。

<Frame>
  <img src="https://mintcdn.com/novitaai/huCNU0PmcVLk7qAw/images/step3-copy-model-name.png?fit=max&auto=format&n=huCNU0PmcVLk7qAw&q=85&s=41c0c4bd42ab8510f95c14e159454239" alt="モデル名をコピーしてメモします" width="3841" height="1905" data-path="images/step3-copy-model-name.png" />
</Frame>

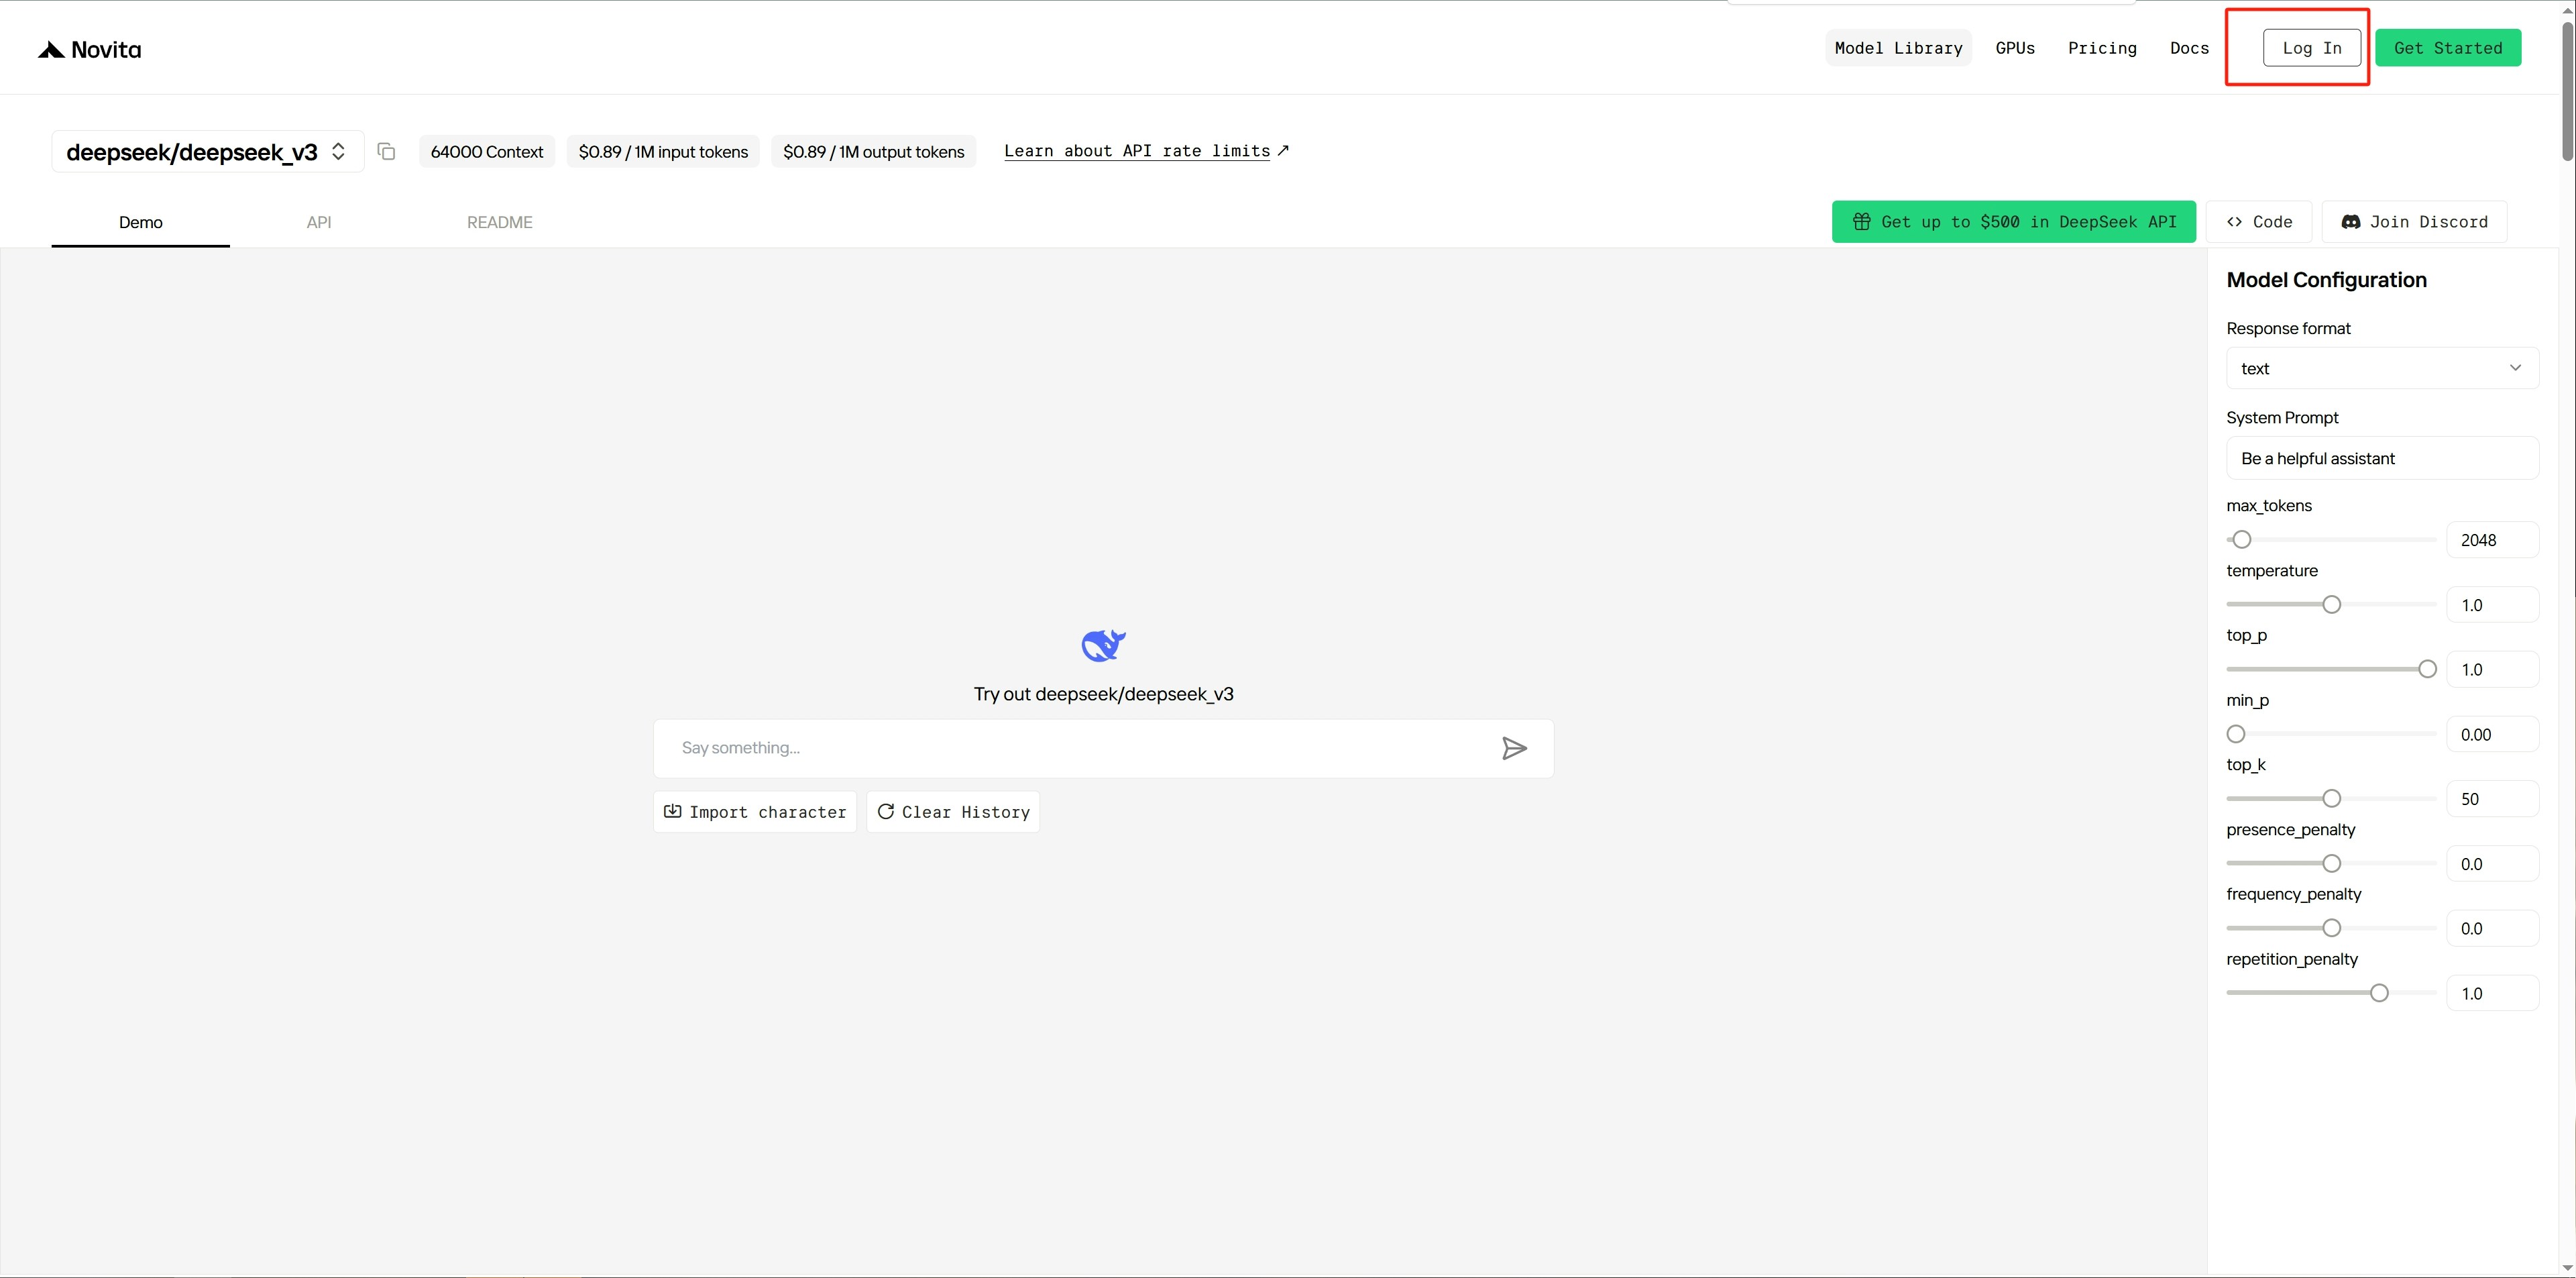
ステップ 4: Novita プラットフォームに[ログイン](https://novita.ai/user/login)します。
<Frame>
  <img src="https://mintcdn.com/novitaai/bnRhXPrVKQGiPndx/images/Step4LogintotheNovitaplatform.png?fit=max&auto=format&n=bnRhXPrVKQGiPndx&q=85&s=d274e15bfd1b4c639512ec19a7ddf6ed" alt="images/Step4LogintotheNovitaplatform.png" width="3841" height="1905" data-path="images/Step4LogintotheNovitaplatform.png" />
</Frame>

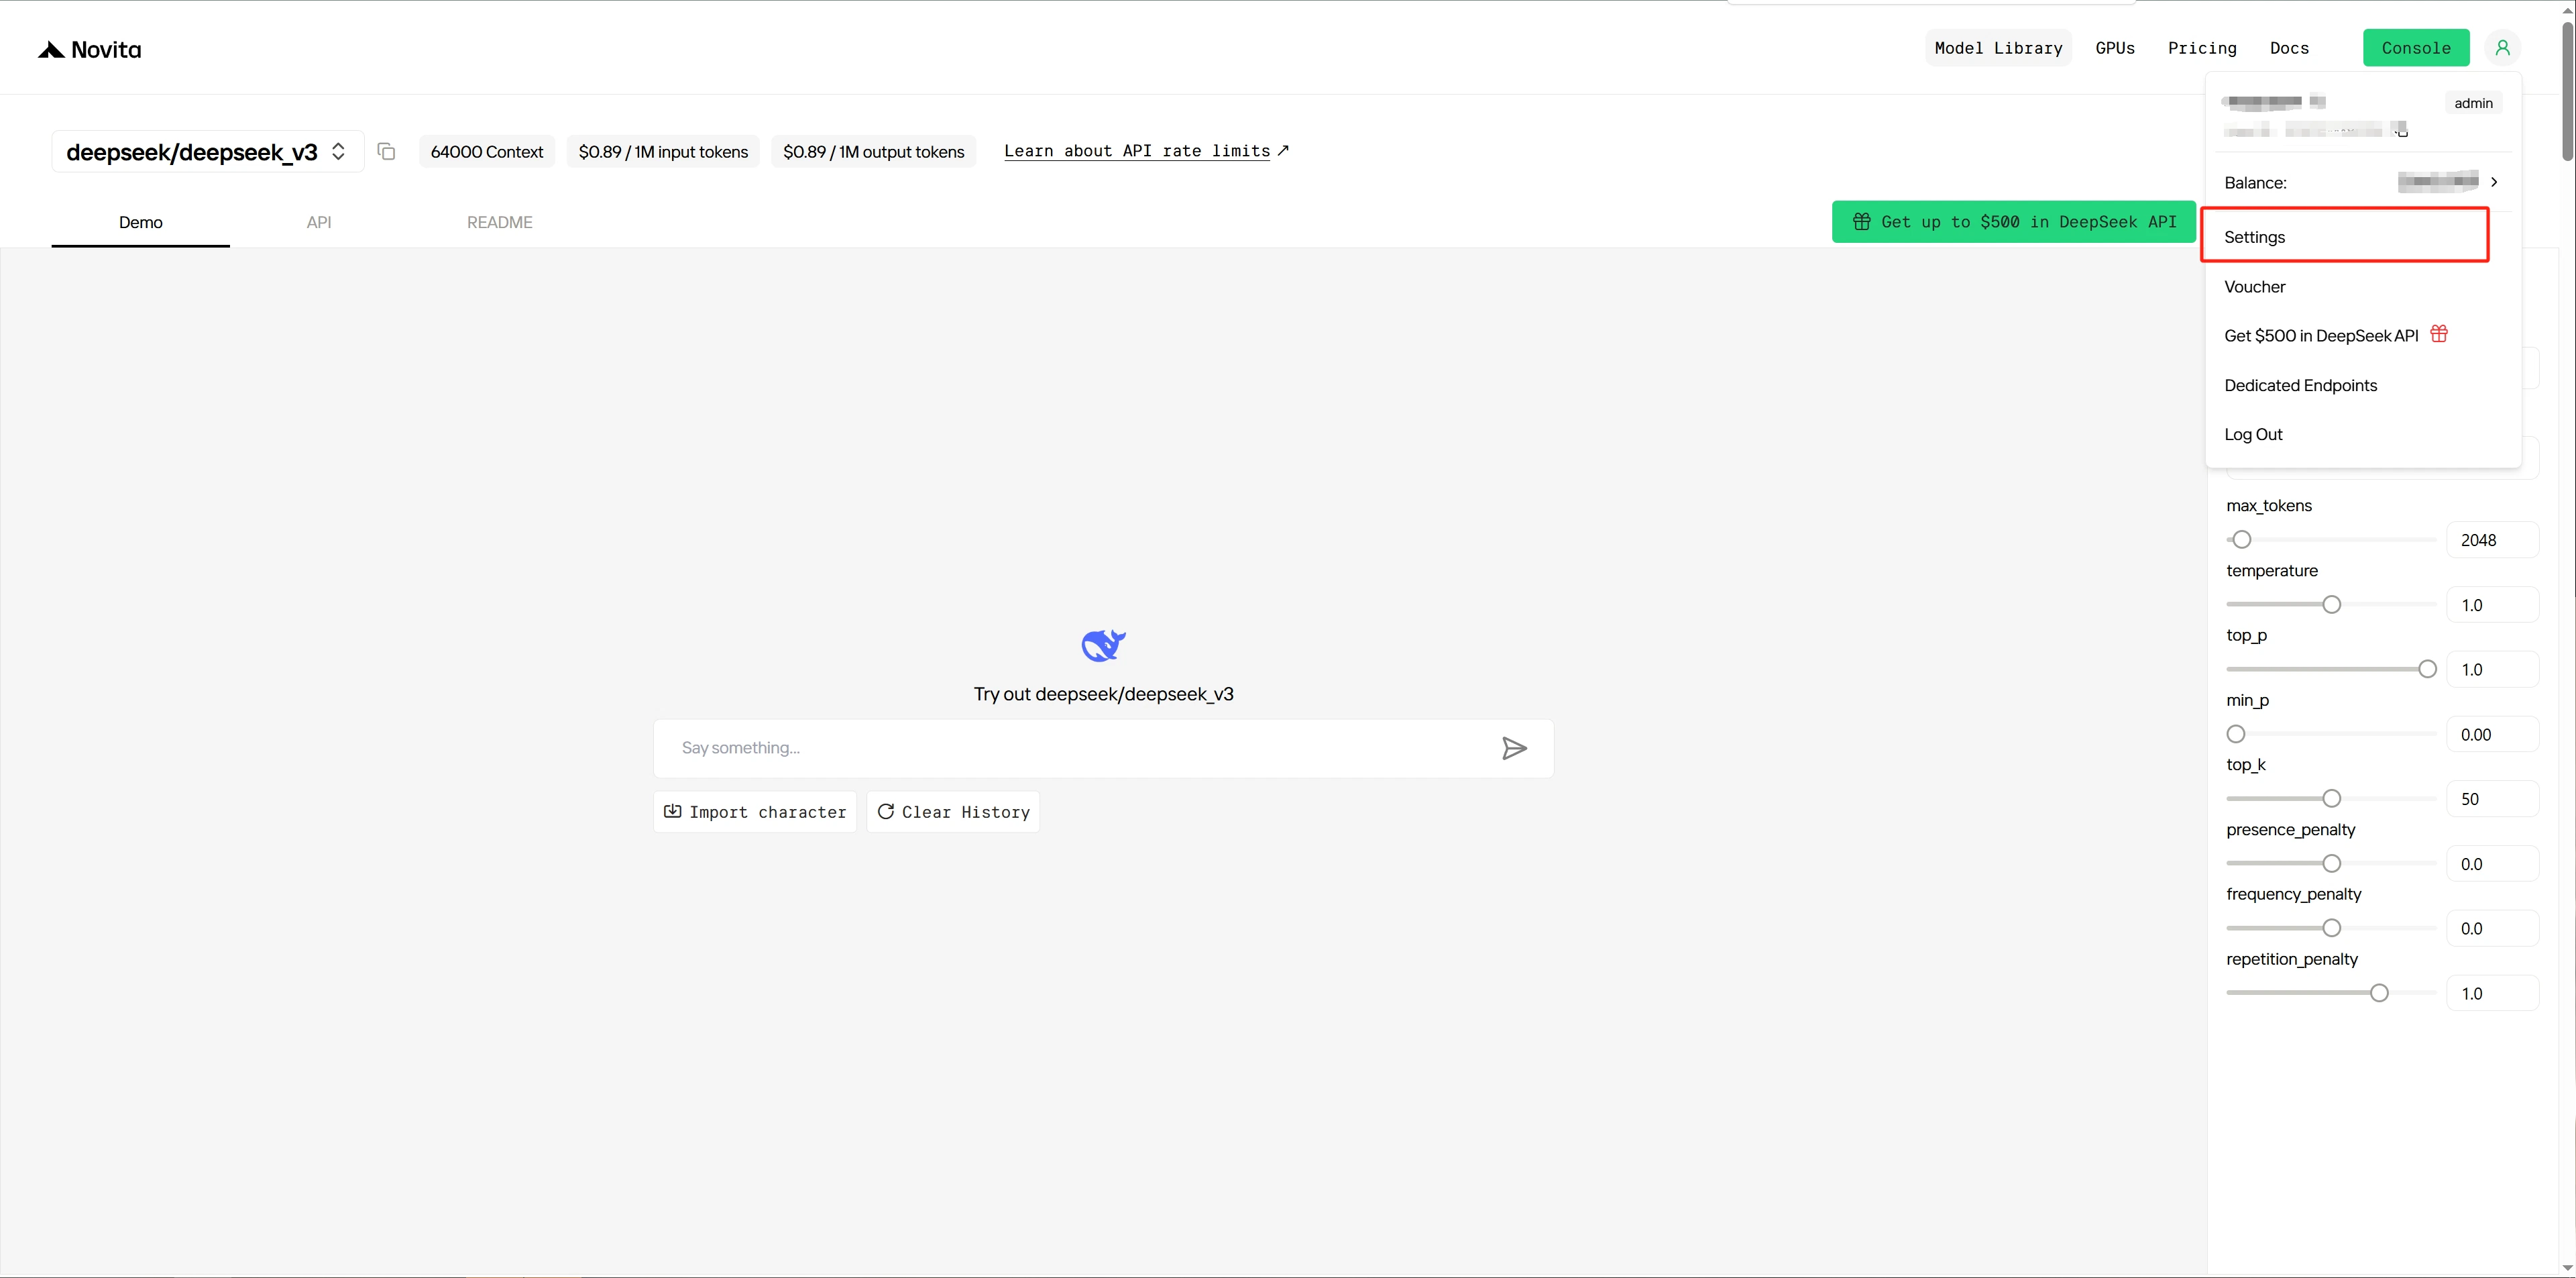
ステップ 5: ログイン後、プラットフォームの[設定ページ](https://novita.ai/settings)に移動します。
<Frame>
  <img src="https://mintcdn.com/novitaai/huCNU0PmcVLk7qAw/images/step5-platform-settings-page.png?fit=max&auto=format&n=huCNU0PmcVLk7qAw&q=85&s=15ea1eed07d2667b57334d65a160f8c4" alt="ログイン後にプラットフォームの設定ページを開きます" width="3841" height="1905" data-path="images/step5-platform-settings-page.png" />
</Frame>

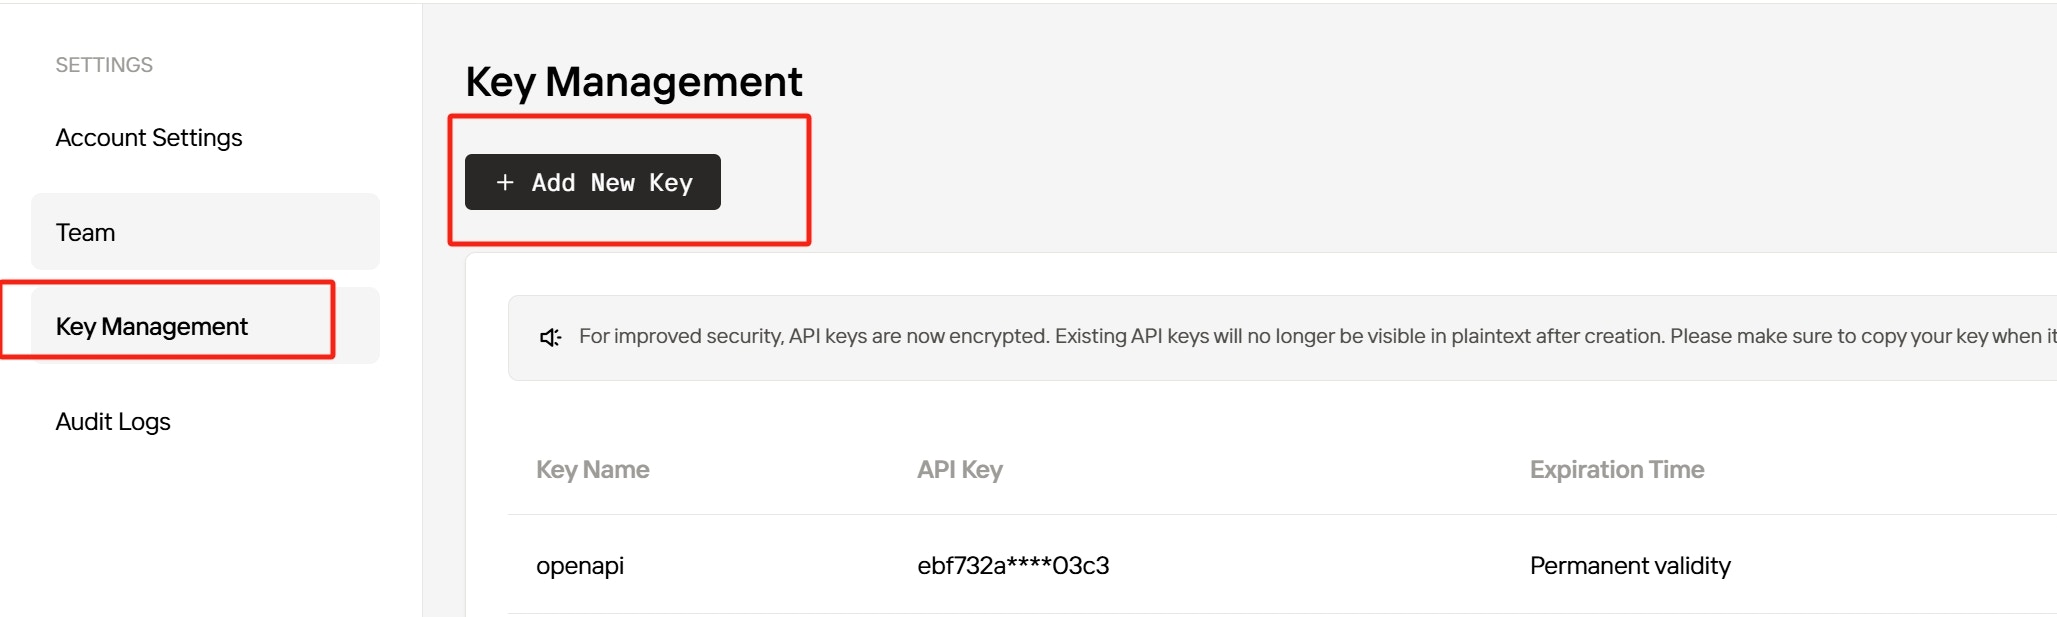
ステップ 6: 新しい [API key](https://novita.ai/settings/key-management) を作成し、サービス認証のためにコピーします。
<Frame>
  <img src="https://mintcdn.com/novitaai/bnRhXPrVKQGiPndx/images/Step6CreateanewAPIkeyandcopyitforserviceauthentication.png?fit=max&auto=format&n=bnRhXPrVKQGiPndx&q=85&s=07b03a5c86e922736118a779e34041ff" alt="images/Step6CreateanewAPIkeyandcopyitforserviceauthentication.png" width="2057" height="617" data-path="images/Step6CreateanewAPIkeyandcopyitforserviceauthentication.png" />
</Frame>

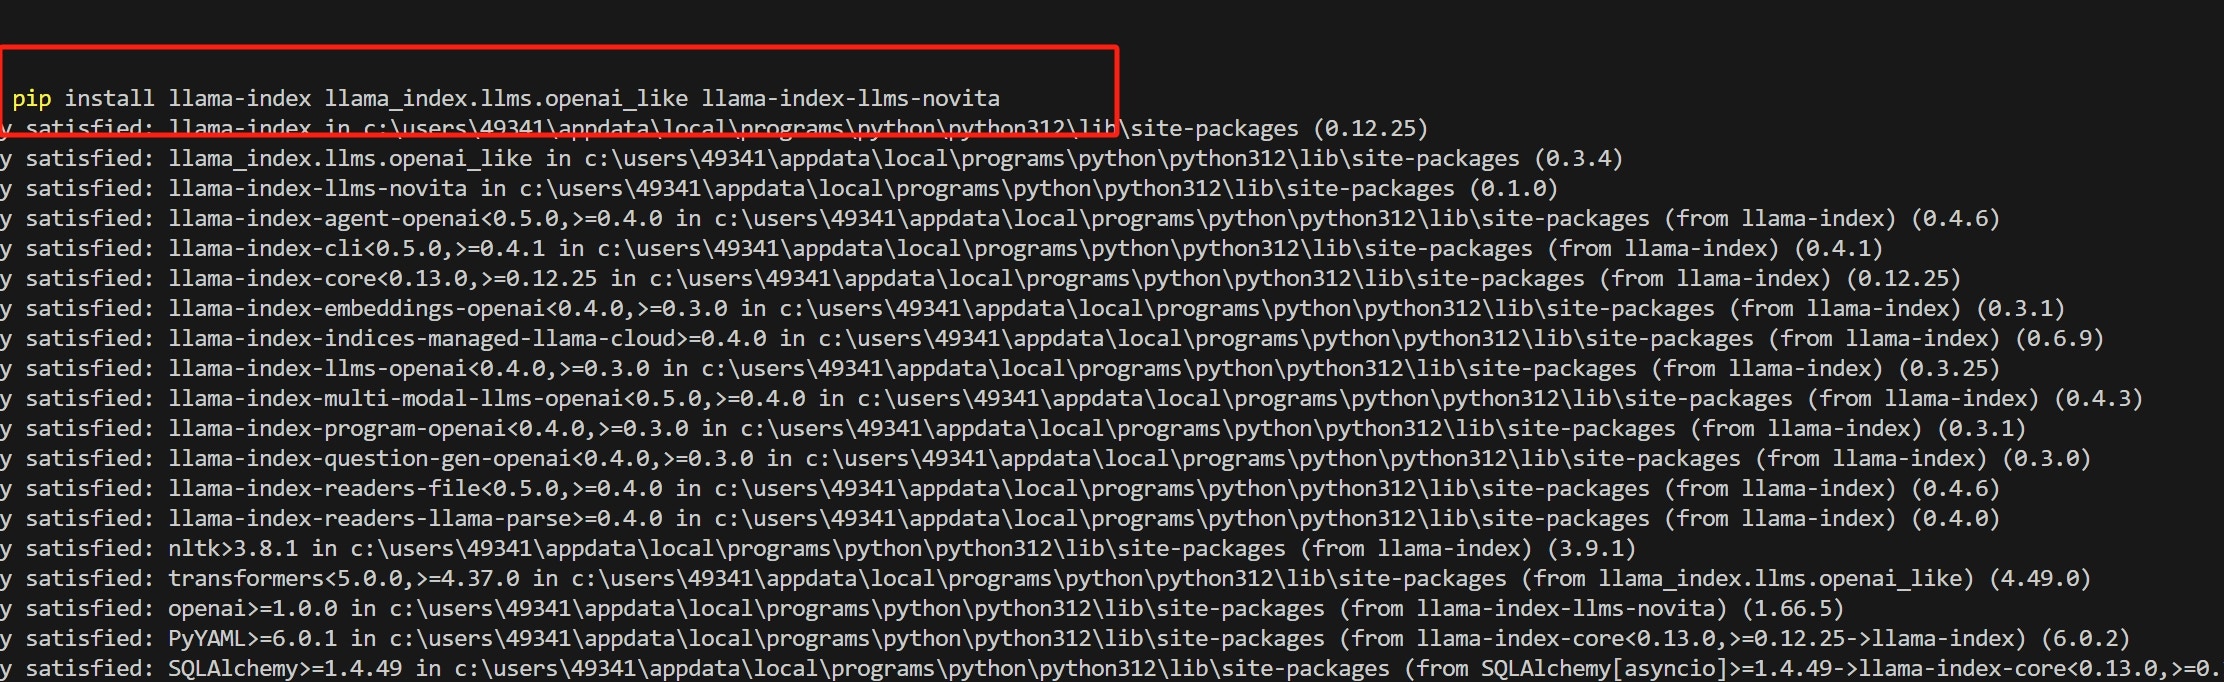
ステップ 7: 次を実行して、`llama_index` と関連する Python ライブラリをインストールします。
<Frame>
  <img src="https://mintcdn.com/novitaai/bnRhXPrVKQGiPndx/images/Step7Installllama_indexandrelatedPythonlibrariesbyrunning.png?fit=max&auto=format&n=bnRhXPrVKQGiPndx&q=85&s=fd802a1818ff357dfcede0fe966e61a9" alt="images/Step7Installllama_indexandrelatedPythonlibrariesbyrunning.png" width="2224" height="682" data-path="images/Step7Installllama_indexandrelatedPythonlibrariesbyrunning.png" />
</Frame>

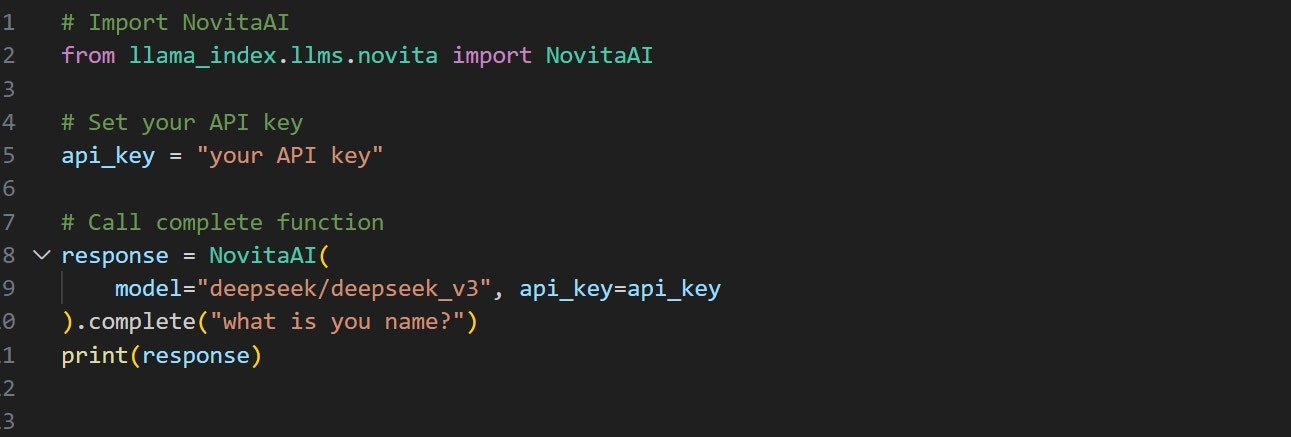
ステップ 8: Python コードを作成し、NovitaAI クラスのパラメータとしてモデル名と API key を設定します。
<Frame>
  <img src="https://mintcdn.com/novitaai/bnRhXPrVKQGiPndx/images/Step8WritePythoncodeandsetthemodelnameandAPIkeyasparametersintheNovitaAIclass.png?fit=max&auto=format&n=bnRhXPrVKQGiPndx&q=85&s=dc8c9b21bd91d18469faab2d238fa9ce" alt="images/Step8WritePythoncodeandsetthemodelnameandAPIkeyasparametersintheNovitaAIclass.png" width="1291" height="437" data-path="images/Step8WritePythoncodeandsetthemodelnameandAPIkeyasparametersintheNovitaAIclass.png" />
</Frame>

ステップ 9: コードを実行して出力を取得します。

<Frame>
  <img src="https://mintcdn.com/novitaai/bnRhXPrVKQGiPndx/images/Step9Runthecodetogettheoutput.png?fit=max&auto=format&n=bnRhXPrVKQGiPndx&q=85&s=4f3bf4015516d4acfc6c079b8a7f8c65" alt="images/Step9Runthecodetogettheoutput.png" width="2089" height="41" data-path="images/Step9Runthecodetogettheoutput.png" />
</Frame>

その他の例については、ドキュメントを参照してください: [llama\_index/llama-index-integrations/llms/llama-index-llms-novita at main · run-llama/llama\_index](https://github.com/run-llama/llama_index/tree/main/llama-index-integrations/llms/llama-index-llms-novita).