> ## Documentation Index
> Fetch the complete documentation index at: https://novita.ai/docs/llms.txt
> Use this file to discover all available pages before exploring further.
# Portkey
> Optimieren Sie die KI-Entwicklung durch die Nutzung von Portkey AI Gateway mit Novita AI für schnelle, sichere und zuverlässige Leistung.
Portkey AI Gateway verändert die Art und Weise, wie Entwickler mit KI-Modellen wie Novita AI arbeiten, und bietet eine einheitliche Schnittstelle für nahtlosen Zugriff auf mehrere Sprachmodelle mit schnellem, sicherem und zuverlässigem Routing. Diese Integration vereinfacht die KI-Entwicklung und verbessert die Anwendungsleistung.
Diese Anleitung führt Sie durch die Einrichtung von Portkey AI Gateway und anschließend durch die Integration der Novita AI API mit Portkey.
## So richten Sie Portkey AI Gateway ein
Die Einrichtung von Portkey AI Gateway ist einfach und effizient und erfordert nur drei zentrale Schritte: das Konfigurieren des Gateways, das Senden Ihrer ersten Anfrage sowie das Optimieren von Routing und Guardrails für nahtlose Leistung.
### Schritt 1: Richten Sie Ihr AI Gateway ein
Um das Gateway lokal auszuführen, stellen Sie sicher, dass Node.js und npm auf Ihrem System installiert sind. Sobald alles bereit ist, führen Sie den folgenden Befehl aus:
```jason theme={"system"}
npx @portkey-ai/gateway
```
Nachdem das Gateway gestartet wurde, werden zwei wichtige URLs angezeigt:
* Das Gateway: `http://localhost:8787/v1`
* Die Gateway Console: `http://localhost:8787/public/`
### Schritt 2: Senden Sie Ihre erste Anfrage
Beginnen Sie mit der Installation der Portkey AI Python-Bibliothek:
```python theme={"system"}
pip install -qU portkey-ai
```
Führen Sie anschließend den folgenden Python-Code aus, um Ihre erste Anfrage zu senden:
```python theme={"system"}
from portkey_ai import Portkey
# OpenAI compatible client
client = Portkey(
provider="openai", # or 'anthropic', 'bedrock', 'groq', etc
Authorization="sk-***" # the provider API key
)
# Make a request through your AI Gateway
client.chat.completions.create(
messages=[{"role": "user", "content": "What's the weather like?"}],
model="gpt-4o-mini"
)
```
Überwachen Sie mühelos alle Ihre lokalen Logs an einem zentralen Ort über die Gateway Console unter: `http://localhost:8787/public/`.
### Schritt 3: Routing & Guardrails
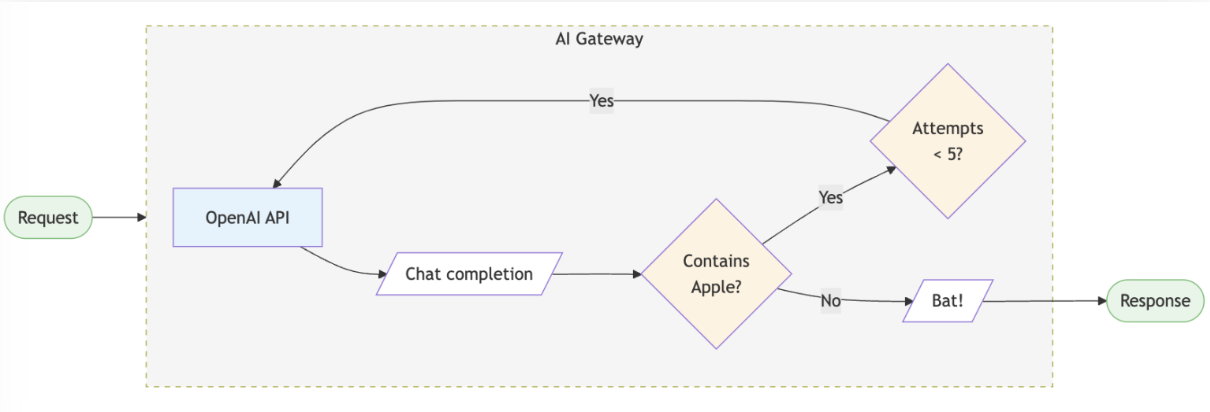
Portkey AI Gateway ermöglicht es Ihnen, Routing-Regeln zu konfigurieren, Zuverlässigkeitsfunktionen hinzuzufügen und Guardrails durchzusetzen. Unten sehen Sie eine Beispielkonfiguration:
```python theme={"system"}
config = {
"retry": {"attempts": 5},
"output_guardrails": [{
"default.contains": {"operator": "none", "words": ["Apple"]},
"deny": True
}]
}
# Attach the config to the client
client = client.with_options(config=config)
client.chat.completions.create(
model="gpt-4o-mini",
messages=[{"role": "user", "content": "Reply randomly with Apple or Bat"}]
)
# In this example, the guardrail denies all replies containing "Apple", so the response would always be "Bat". The retry configuration would attempt the request up to 5 times before giving up.
```
 ## So integrieren Sie die Novita AI API mit Portkey
Um über Portkey AI Gateway auf die Novita AI API zuzugreifen, befolgen Sie diese Schritte:
### Schritt 1: Installieren Sie das Portkey SDK
Integrieren Sie das Portkey SDK in Ihre Anwendung, um über das Gateway von Portkey nahtlos mit der API von Novita AI zu interagieren.
**Node.JS**
```jason theme={"system"}
npm install --save portkey-ai
```
**Python**
```python theme={"system"}
pip install portkey-ai
```
### Schritt 2: Initialisieren Sie Portkey mit dem Virtual Key
Um Novita AI mit Portkey zu integrieren, rufen Sie Ihren LLM API Key von[ Novita AI ](https://novita.ai/settings/key-management)ab und fügen Sie ihn zu Portkey hinzu, um den Virtual Key zu generieren.
**Node.JS SDK**
```jason theme={"system"}
import Portkey from 'portkey-ai'
const portkey = new Portkey({
apiKey: "PORTKEY_API_KEY", // Replace with your Portkey API key
virtualKey: "VIRTUAL_KEY" // Replace with your virtual key for Novita AI
})
```
**Python SDK**
```python theme={"system"}
from portkey_ai import Portkey
portkey = Portkey(
api_key="PORTKEY_API_KEY", # Replace with your Portkey API key
virtual_key="VIRTUAL_KEY" # Replace with your virtual key for Novita AI
)
```
### Schritt 3: Rufen Sie Chat Completions mit Novita AI auf
Verwenden Sie die Portkey-Instanz, um Anfragen an Novita AI zu senden. Falls erforderlich, können Sie den Virtual Key direkt innerhalb des API-Aufrufs überschreiben.
**Node.JS SDK**
```jason theme={"system"}
const chatCompletion = await portkey.chat.completions.create({
messages: [{ role: 'user', content: 'Say this is a test' }],
model: 'Nous-Hermes-2-Mixtral-8x7B-DPO'
});
console.log(chatCompletion.choices);
```
**Python SDK**
```python theme={"system"}
completion = portkey.chat.completions.create(
messages= [{ "role": 'user', "content": 'Say this is a test' }],
model= 'reka-core'
)
print(completion)
```
## So integrieren Sie die Novita AI API mit Portkey
Um über Portkey AI Gateway auf die Novita AI API zuzugreifen, befolgen Sie diese Schritte:
### Schritt 1: Installieren Sie das Portkey SDK
Integrieren Sie das Portkey SDK in Ihre Anwendung, um über das Gateway von Portkey nahtlos mit der API von Novita AI zu interagieren.
**Node.JS**
```jason theme={"system"}
npm install --save portkey-ai
```
**Python**
```python theme={"system"}
pip install portkey-ai
```
### Schritt 2: Initialisieren Sie Portkey mit dem Virtual Key
Um Novita AI mit Portkey zu integrieren, rufen Sie Ihren LLM API Key von[ Novita AI ](https://novita.ai/settings/key-management)ab und fügen Sie ihn zu Portkey hinzu, um den Virtual Key zu generieren.
**Node.JS SDK**
```jason theme={"system"}
import Portkey from 'portkey-ai'
const portkey = new Portkey({
apiKey: "PORTKEY_API_KEY", // Replace with your Portkey API key
virtualKey: "VIRTUAL_KEY" // Replace with your virtual key for Novita AI
})
```
**Python SDK**
```python theme={"system"}
from portkey_ai import Portkey
portkey = Portkey(
api_key="PORTKEY_API_KEY", # Replace with your Portkey API key
virtual_key="VIRTUAL_KEY" # Replace with your virtual key for Novita AI
)
```
### Schritt 3: Rufen Sie Chat Completions mit Novita AI auf
Verwenden Sie die Portkey-Instanz, um Anfragen an Novita AI zu senden. Falls erforderlich, können Sie den Virtual Key direkt innerhalb des API-Aufrufs überschreiben.
**Node.JS SDK**
```jason theme={"system"}
const chatCompletion = await portkey.chat.completions.create({
messages: [{ role: 'user', content: 'Say this is a test' }],
model: 'Nous-Hermes-2-Mixtral-8x7B-DPO'
});
console.log(chatCompletion.choices);
```
**Python SDK**
```python theme={"system"}
completion = portkey.chat.completions.create(
messages= [{ "role": 'user', "content": 'Say this is a test' }],
model= 'reka-core'
)
print(completion)
```